
Discover the magic of creating Lightning McQueen chocolates with a specialized mold. Perfect for fans of the beloved character, this mold brings his iconic eyes and mouth to life in delicious, detailed treats. Fun for both kids and adults!
1.1 What is a Lightning McQueen Chocolate Mold?
A Lightning McQueen Chocolate Mold is a specially designed kitchen tool used to create chocolate treats shaped like the iconic character from the Cars franchise. It typically features detailed cavities that capture Lightning McQueen’s recognizable design, including his sleek car body, expressive eyes, and cheerful mouth. This mold is perfect for fans of all ages who want to create personalized chocolates for parties, gifts, or everyday treats. Made from durable, food-safe materials, the mold ensures that each chocolate piece retains crisp details and vibrant features. Its design often includes multiple cavities, allowing for batch production of chocolates. Whether you’re a professional chocolatier or a hobbyist, this mold brings a fun and creative way to celebrate Lightning McQueen’s charm in edible form. The mold’s versatility also makes it a great addition to themed events or as a unique activity for kids and adults alike.
By using this mold, you can effortlessly craft chocolates that resemble the beloved character, making them a delightful surprise for any Cars enthusiast. The detailed design ensures that the final products are both visually appealing and delicious, offering a sweet way to enjoy Lightning McQueen’s spirit.
1.2 Why Make Lightning McQueen Chocolate Candies?
Creating Lightning McQueen chocolate candies is a fun and creative way to bring the beloved character to life in a delicious and customizable treat. Perfect for fans of all ages, these chocolates make great gifts, party favors, or snacks for themed events. The process allows for personalization, as you can choose the type of chocolate and add colors to match Lightning McQueen’s iconic design. It’s also a wonderful activity for kids, teaching them about creativity and the joy of handmade treats. Adults will appreciate the nostalgic appeal and the satisfaction of crafting something unique and edible. Whether for a birthday celebration, holiday gift, or simply as a surprise, Lightning McQueen chocolates are sure to delight. They combine the charm of the character with the richness of high-quality chocolate, making them a memorable and tasty experience for everyone involved.
Moreover, making these chocolates is a great way to share your love for the Cars franchise while enjoying a sweet and rewarding hobby. It’s a perfect blend of creativity and indulgence!
Materials Needed
Gather a Lightning McQueen chocolate mold, high-quality chocolate, a double boiler or melting pot, food-grade coloring, and tools for detailing. These essentials ensure precise details and vibrant colors for your racing-themed treats.
2.1 Lightning McQueen Chocolate Mold
A Lightning McQueen chocolate mold is a silicone or plastic mold designed to create chocolate candies shaped like the beloved character from the Cars franchise. These molds are typically detailed, capturing Lightning McQueen’s iconic features, such as his eyes, mouth, and racing design. They come in various sizes, from small, bite-sized chocolates to larger, more intricate pieces. The mold is made of food-safe materials, ensuring durability and easy cleanup. It is specifically crafted to help you achieve sharp, clear details in your chocolates, making them look professional and visually appealing. Whether you’re creating treats for a themed party, a special occasion, or just for fun, the Lightning McQueen chocolate mold is an essential tool for bringing the character to life in chocolate form. Its ease of use and detailed design make it a great choice for both beginners and experienced chocolate makers.
2.2 High-Quality Chocolate
High-quality chocolate is essential for creating professional-looking and delicious Lightning McQueen candies. Choose chocolate with a high cocoa content (at least 30% for milk chocolate and 70% for dark chocolate) for the best flavor and texture. Avoid chocolate with artificial additives or low cocoa butter content, as it may not melt smoothly or set properly. For a vibrant and true-to-character appearance, opt for chocolate that can be colored or is already in a shade that matches Lightning McQueen’s iconic red and yellow hues. Consider using chocolate specifically designed for molding, as it tends to have better flow properties and a glossy finish. Always ensure the chocolate is fresh and stored properly to maintain its quality. The right chocolate will ensure your Lightning McQueen candies are not only visually appealing but also a delight to eat.
2.3 Double Boiler or Melting Pot
A double boiler or a dedicated chocolate melting pot is a crucial tool for smoothly melting chocolate to the perfect consistency. A double boiler consists of a heatproof bowl placed over a pot of simmering water, ensuring gentle and even heating without direct flame contact, which can burn the chocolate. If you prefer convenience, a melting pot specifically designed for chocolate is an excellent alternative, as it maintains precise temperature control. Both options are essential for achieving a smooth, glossy finish on your Lightning McQueen chocolates. When using either method, make sure the water does not boil vigorously, as excessive heat can damage the chocolate. For best results, use high-quality chocolate and avoid overheating, as this can cause the chocolate to seize or lose its texture. Properly melting the chocolate is the foundation for creating crisp, detailed, and professional-looking candies.
2.4 Food-Grade Coloring
Food-grade coloring is essential for achieving the vibrant, recognizable details of Lightning McQueen’s eyes and mouth on your chocolate creations. These colorings are specifically designed for use in edible products, ensuring safety and stability when mixed with chocolate. They come in various forms, including liquid, gel, or powder, with each offering different levels of intensity and ease of use. When adding coloring, it’s important to mix it into the melted chocolate thoroughly to avoid uneven tones. A small amount of coloring goes a long way, so start with a tiny quantity and gradually add more until you reach the desired shade. Be cautious not to over-color, as this can affect the chocolate’s texture and flavor. Always opt for high-quality, food-safe products to ensure the best results and safety for consumption. Proper use of food-grade coloring will bring the iconic red, black, and white hues of Lightning McQueen to life in your chocolates, making them both visually appealing and delicious.
2.5 Tools for Details
To achieve the precise details of Lightning McQueen’s eyes and mouth, you’ll need specialized tools. A toothpick is ideal for creating fine lines, such as the outline of the eyes or the mouth. Small, clean paintbrushes can be used to apply melted chocolate or coloring to intricate areas. For more defined edges, a precision knife or a sharp utility knife can carefully trim excess chocolate. Additionally, a plastic spatula or offset spatula is useful for smoothing out surfaces and ensuring even distribution of chocolate in the mold. These tools are essential for bringing the iconic character to life in your chocolates. By using the right tools, you can create sharp, clean details that make your Lightning McQueen chocolates stand out. Proper use of these tools ensures that the final product is both visually appealing and true to the character’s design, making it a delightful treat for fans of all ages.

Step-by-Step Instructions

Start by preparing the mold, then melt the chocolate to the perfect consistency. Pour it into the mold, adding details like eyes and mouth with a toothpick or small brush. Let it cool, then carefully remove the chocolate from the mold. Repeat for multiple pieces, assembling as needed. Allow the chocolate to set completely before serving. This process ensures each piece captures Lightning McQueen’s iconic look. Follow these steps carefully for professional-looking results. Patience and attention to detail are key to creating flawless chocolates that resemble the beloved character. With practice, you’ll master the technique and impress friends and family with your creations. Enjoy the process of bringing Lightning McQueen to life in chocolate!

3.1 Preparing the Mold
Begin by thoroughly cleaning the Lightning McQueen chocolate mold with mild soap and warm water. Rinse and dry it with a soft cloth to ensure no residue remains. Place the mold on a flat, stable surface to prevent shifting during the chocolate-pouring process. Lightly spray or brush the interior with a small amount of food-grade oil to ensure the chocolate will release easily once set. Next, carefully align the eyes and mouth details within the mold, using a toothpick or small tool to secure them in place if necessary. Make sure the mold is free of dust or debris, as this can affect the final appearance of the chocolates. Handle the mold gently to avoid damaging the intricate details. Finally, double-check that the mold is completely dry and ready for the chocolate. Proper preparation ensures smooth, detailed, and professional-looking results. This step is crucial for achieving the iconic Lightning McQueen design in your chocolates. Take your time to ensure everything is perfectly aligned and ready for the next step in the process.
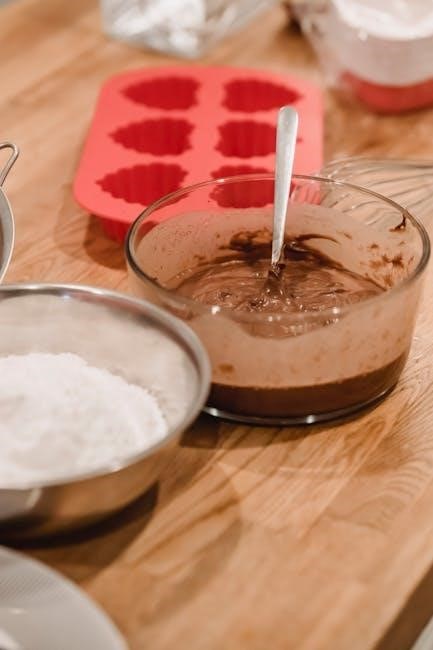
3.2 Melting the Chocolate
Begin by selecting high-quality chocolate suitable for molding. Break the chocolate into small pieces to ensure even melting. Use a double boiler or a dedicated chocolate melting pot to melt the chocolate gently. Avoid direct heat, as it can burn the chocolate. Stir occasionally until the chocolate reaches a smooth, liquid consistency. If using a microwave, heat in short intervals (10-15 seconds) and stir between each interval to prevent overheating. Once melted, remove from heat and let cool slightly to a workable temperature. For colored chocolate, stir in a few drops of food-grade dye until the color is evenly distributed. Be careful not to overheat, as this can cause the chocolate to seize or lose its shine. Properly melted chocolate is essential for achieving sharp details in the Lightning McQueen design. Allow the chocolate to cool slightly before pouring into the mold to ensure it flows smoothly and evenly. This step sets the foundation for creating crisp, detailed chocolates with vibrant colors and a professional finish.
3.3 Creating Eyes and Mouth Details

To achieve Lightning McQueen’s distinctive eyes and mouth, precision is key. Once the melted chocolate has slightly cooled, pour it into the mold’s designated details section. Use a toothpick or small tool to carefully fill in the intricate areas for the eyes and mouth. Gently tap the mold to eliminate air bubbles, ensuring a smooth finish. Allow the details to set at room temperature or chill in the refrigerator for a few minutes. Once firm, these small chocolate pieces will be ready to assemble. For added vibrancy, food-grade coloring can be applied to the melted chocolate before pouring it into the details section. This step requires patience and steady hands to capture the character’s recognizable features accurately. Properly executing this part is crucial for bringing Lightning McQueen to life in chocolate form. Ensure the details are crisp and well-defined, as they are the focal points of the final piece. This attention to detail will make your chocolates stand out and delight both kids and fans of the character.
3.4 Assembling the Mold
Once the chocolate details and base layer are set, carefully assemble the mold. Start by aligning the pre-made eyes and mouth with their designated spaces in the Lightning McQueen mold. Gently press these pieces into place, ensuring they fit securely without shifting. If needed, use a small amount of melted chocolate to act as an adhesive, applying it with a toothpick for precision. Next, pour the remaining melted chocolate into the main body of the mold, filling it to the brim. Use a spatula to smooth the top for an even finish. Lightly tap the mold on the countertop to remove any air bubbles that may form. Allow the chocolate to cool and harden completely. Once set, the pieces will be perfectly aligned, creating a detailed and recognizable Lightning McQueen chocolate. Proper assembly ensures a professional-looking final product that captures the character’s iconic features.
3.5 Cooling and Setting
Allowing the chocolate to cool and set is a crucial step in achieving professional-looking results. Place the assembled mold on a flat, stable surface, ensuring it is away from direct sunlight or heat sources. Let the chocolate cool at room temperature for about 30 minutes, or until it reaches a firm, solid state. Avoid moving or touching the mold during this time, as it can cause the chocolate to shift or smudge. Once set, the details, such as Lightning McQueen’s eyes and mouth, will hold their shape perfectly. For faster setting, you can place the mold in the refrigerator for 10–15 minutes. However, be cautious not to leave it too long, as condensation could form and affect the chocolate’s finish. Patience is key here, as proper cooling ensures the chocolate retains its vibrant colors and sharp details. Once completely set, your Lightning McQueen chocolate is ready to be carefully removed from the mold and enjoyed!
3.6 Finishing Touches
Once the chocolate is set and removed from the mold, it’s time to add those final flourishes that bring Lightning McQueen to life. Gently inspect the chocolate for any small imperfections, such as air bubbles or uneven edges, and smooth them out with a toothpick or a small knife. If needed, use a dab of melted chocolate to fill in any gaps. For an extra polished look, lightly buff the chocolate with a soft cloth to remove any fingerprints or smudges. Consider adding a background or base, like a layer of white or colored chocolate, to make the design pop. Finally, allow the chocolate to harden completely before serving or displaying. These finishing touches ensure your Lightning McQueen chocolate is not only delicious but also visually stunning, making it perfect for gifts, parties, or special treats for fans of the character.

Tips for Achieving Perfection
Mastering Lightning McQueen chocolates requires attention to detail and the right techniques. Use high-quality chocolate for a smooth finish, ensure precise coloring for vibrant eyes and mouth, and smooth out any imperfections for a polished look. Practice makes perfect!
4.1 Choosing the Right Chocolate
Selecting the right chocolate is crucial for creating professional-looking Lightning McQueen candies. Opt for high-quality chocolate with a high cocoa butter content for a smooth, glossy finish. Dark, milk, or white chocolate can be used, depending on your preference. Ensure the chocolate is suitable for molding to avoid texture issues. Avoid chocolate with high sugar content, as it can make the chocolate too soft and difficult to work with. Tempering the chocolate is also essential to achieve a crisp, snappy finish and prevent blooming. Experiment with different brands and types to find the one that works best for you and brings out the vibrant details of Lightning McQueen’s eyes and mouth. The right chocolate will make your creations stand out and ensure they taste as great as they look;
4.2 Achieving the Perfect Color
Achieving the perfect color for Lightning McQueen’s eyes and mouth is essential for a lifelike finish. Use food-grade coloring to tint the chocolate, ensuring the hues match the character’s iconic design. Start with small amounts of coloring and mix well, as over-coloring can lead to a messy finish. For precise details, use a toothpick to carefully paint the eyes and mouth with melted, colored chocolate. Always test the color on a small, inconspicuous area first to ensure accuracy. For a polished look, avoid overfilling the mold, as excess chocolate can blur the fine details. If needed, use a small brush or tool to smooth out edges. Proper coloring enhances the visual appeal and brings the character to life. Remember, consistency and precision are key to achieving the perfect, recognizable Lightning McQueen features.
4.3 Smoothing Out Imperfections
Smoothing out imperfections is crucial for creating professional-looking Lightning McQueen chocolates. Start by ensuring the mold is clean and dry to prevent any unwanted textures. When pouring the chocolate, tap the mold gently to remove air bubbles, which can cause uneven surfaces. For minor imperfections, such as small air pockets or excess chocolate, use a toothpick or a small, flat tool to smooth the area before the chocolate sets. If the chocolate is slightly melted, you can also use a cotton swab dipped in melted chocolate to fill in gaps or even out edges. Avoid overfilling the mold, as this can lead to messy overflow that’s difficult to correct. Once set, lightly scrape any excess chocolate from the edges with a sharp knife or spatula. For a polished finish, allow the chocolate to cool completely before handling. Remember, practice makes perfect, and with patience, you’ll achieve smooth, professional results every time.
4.4 Using the Right Tools
Using the right tools is essential for creating detailed and precise Lightning McQueen chocolates. A double boiler or melting pot is fundamental for melting chocolate to the perfect consistency. A spatula is ideal for pouring the chocolate smoothly into the mold, ensuring even distribution. For intricate details like the eyes and mouth, use a toothpick or a small, pointed tool to carve or fill in these areas. A sharp knife or trimming tool can help remove excess chocolate and clean up the edges of the mold. Tweezers may also be useful for placing small chocolate details accurately. Additionally, a flat tool, such as the back of a knife or an offset spatula, can be used to smooth out the chocolate surface for a polished finish. Always ensure your tools are clean and dry before use to prevent contamination or sticking. By having the right tools on hand, you can achieve professional-looking results and make the process more efficient and enjoyable.
Safety Precautions
Ensure a safe experience when creating Lightning McQueen chocolates. Handle heat sources carefully and avoid burns. Keep tools and workspace clean to maintain hygiene. Use protective gloves and goggles for added safety.
5.1 Working with Heat
When working with heat, especially when melting chocolate in a double boiler or melting pot, it’s crucial to exercise caution to avoid burns. Always use oven mitts or tongs to handle hot equipment, and keep a safe distance from children. Never leave melting chocolate unattended, as it can quickly overheat and cause accidents. Make sure your workspace is clear of flammable materials and keep a fire extinguisher nearby. Additionally, avoid wearing loose clothing that could catch fire near open flames or hot surfaces. If using a microwave to melt chocolate, do so in short intervals and stir between each heating to prevent overheating. Remember, safety should always be your top priority when working with heat to ensure an enjoyable and accident-free chocolate-making experience.
5.2 Handling Food Safely
Handling food safely is essential when working with chocolate molds, especially when creating Lightning McQueen chocolates. Always wash your hands thoroughly before starting, and ensure all utensils and surfaces are clean and sanitized. Use food-grade tools and avoid cross-contamination by keeping raw materials separate. When melting chocolate, do so in a clean, sanitized environment to prevent bacterial growth. Store the finished chocolates in an airtight container at room temperature to maintain freshness and prevent spoilage. Avoid touching the chocolate excessively, as oils from your skin can cause it to bloom or become discolored. Keep the workspace clean throughout the process to minimize the risk of contamination. By following these guidelines, you can ensure your Lightning McQueen chocolates are not only delicious but also safe to eat.